

Social media’s a relatively new media format – short-form video especially so. Many creators are discovering their own methods for planning and organizing their content, but there’s one older, well-respected form that also creates video content. Film and TV. So, why not take some of their tricks and apply it to your own content? We’ll start off with one of the better known – and more effective: storyboards.
What Are Storyboards? 🎥
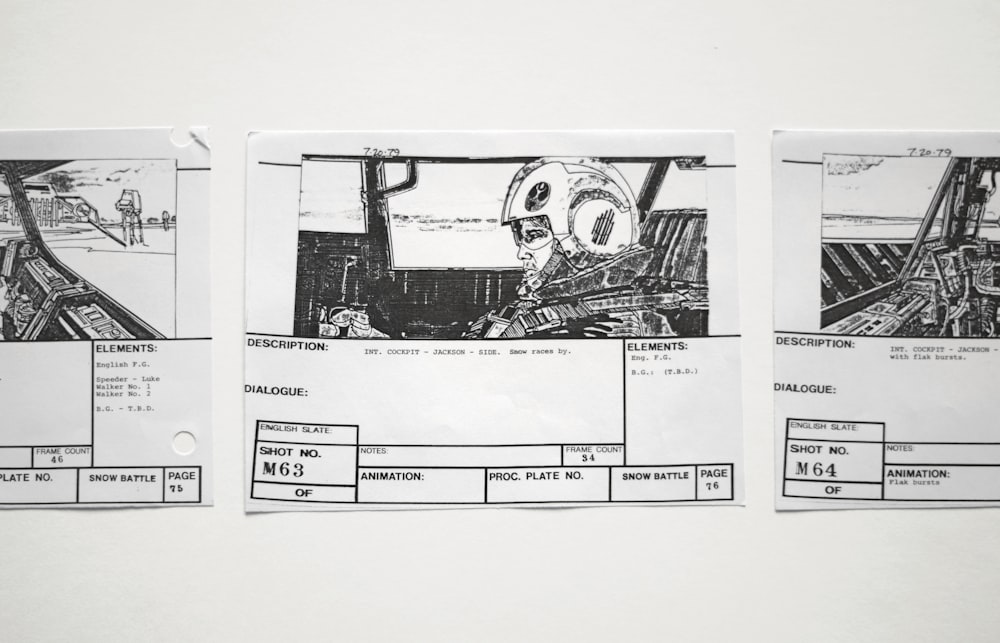
Storyboards are visual tools used in the pre-production of various video or visual content. They’re best known for their use in films, animations, commercials, and photography, but are sometimes used by writers and other creatives. Storyboards consist of illustrated or sketched panels, arranged to represent the key shots or scenes of a narrative. Each panel is made up of images and brief descriptions to convey the necessary elements in this scene or shot.
The main purpose of storyboards is to plan the visual aspects of a project. It gives creatives the chance to “see” how shots will look and mesh together. Storyboards create a clear and cohesive understanding of the narrative structure, visual composition, and pacing. They also help make decisions regarding camera angles, composition, and the overall visual style of the project.
What’s In A Storyboard? 📰
There’s a few elements that your storyboard needs to have. While some of the elements are extra or help add necessary context, there’s just three main elements to include.
Panels ✅
This is essential. Every storyboard has to have pictures representing the scene. These can be detailed drawings of the shot and the elements included, or it can be a very rough sketch with stick-figures and blobs. So long as you can tell what it is and what is needed, the pictures can be as in-depth as you like.
Description ✅
Every panel needs some kind of small description. This is usually one or two lines summarizing what happens in the shot, or may be what dialogue is covered in the shot.
Some extra elements include…
Camera Directions ✅
If you want the camera to do something specific, like zoom-in or pane to something else, make a note of that in the description.
Scene Transitions ✅
If you want the scene to somehow transition out (not a cut, but a pane or fade), add that to the notes!
Notes about Sounds ✅
Some scenes require specific music or sound effects: add it into the description, and say when it starts playing.
Notes for Actions ✅
When a specific action or motion is needed in a scene, it’ll need to be notated.
Now that we’ve covered what a storyboard is and what you need in them, let’s dive into how you can use them!
Storyboards and Social Media 📝

Storyboards can help content creators plan and organize their content. And that doesn’t just go for creators that film mini series or narrative content: any creator can benefit from storyboarding. There are three main ways we see creators using storyboards either before or after they film their content.
Organizing Footage 🗃️
After you’ve filmed everything you need for your video and before you sit down to edit it, try storyboarding. You’ll have a clear idea of what pieces you have and what order you could put them in. But storyboarding will force you to sit down and think of the narrative structure you want.
It also gives you the opportunity to explore some different narrative options. You have all the videos, know the moments you want to use, and now you can think of an engaging way to organize it. That might be introducing a quick clip to act as a hook, or finding places to add humor.
Planning Shots in Advance 🖼️
If you’re working on a video with multiple shots and camera angles, spend some time thinking through and planning them beforehand. Are there ay elements you want to make sure are in the shot? Any angles you want to try?
This planning process can lead to more efficient production, improved content quality, and a better connection with the target audience.
Structuring the Narrative 📈
As we mentioned, storyboards can be used to experiment with the structure of the narrative. Rather than just going in chronological order, storyboards force you to think of everything you want to cover and how you can make it interesting. As an example, instead of posting a sewing tutorial that’s just your hands with a voiceover, storyboarding might make you realize you want stock images, multiple angles of your hands, or a few clips of you talking to the camera. Storyboarding can expand the narrative and get you thinking outside of the box.
How to Create an Effective Storyboard💡
Let’s walkthrough creating a storyboard together! In this example, we’re planning a video showing how to link your other profiles to your Clapper account. Let’s get into the opening image!
The first step is identifying the key elements. What do you need in the shot to make it work? In this example, we’ll need to see someone using their phone. Stylistically, we’d like a shot of their hands scrolling or adding to their profile. For our storyboard, we’d either make a quick sketch of that shot or find a stock picture to use instead. To make it easier on us, we’ll grab a stock picture!
Now that we have a physical representation, the second step is writing a description of the action. For this example scene, the description can be simple! Something like “shot of creator scrolling on their phone”. You can make this more detailed if needed, but still keep it short! If you’re going super granular, you can also include how long you want this shot to last.
The third step is adding effects. This includes sounds, transitions, or any notes for people involved in production. In a tutorial video, we’d include a note that there’ll be a voiceover (even if we don’t have the script for it yet) and the kind of music we want. And, for setting purposes, maybe we want a prop in the background of the video! Those notes would look like “Will include a voiceover. Add up-beat, excited music. Include a cup of coffee and a newspaper in the background.” Again, these can be as detailed or as short as you like!
Putting it all together, the first panel for our story board would look like this:
You would repeat this for as many shots and panels as you need. There’s no limit, and studios create storyboards for full-length films. The entire point is to make your planning process easier, so do what works best for you!
For Further Reading 📚
if you’d like to dive into storyboarding, there’s a few other resources we recommend! This WikiHow article goes into great detail on creating storyboards. Canva also has a good write-up, and is a free tool you can use to create a digital storyboard. Masterclass’ article on storyboarding (taken from their class by living icon, Jodie Foster) is another easy read. Not to mention you’ll find a lot of other tutorials or examples on social media! Search up storyboards or storyboarding and see what creators on your platform are saying about them.